Insert Image
Insert Image
Insert Image
|
Menu:
|
Draw  Insert Image Insert Image
|
|
Shortcut Keys:
|
|
|
Toolbar Icon:
|

|
The Insert Image command will allow you to place a raster image file on the design screen. The command may be used to load a background image for designing, or it may simply be used to place a company logo on a design or title block.
To insert an image on the design screen from a file on the computer:
-
Click on the Load Image from File  button or the Open
  icon in the top left corner of the Image Insertion dialog box.
-
Use the Open dialog box to change to the folder containing the image file to open.
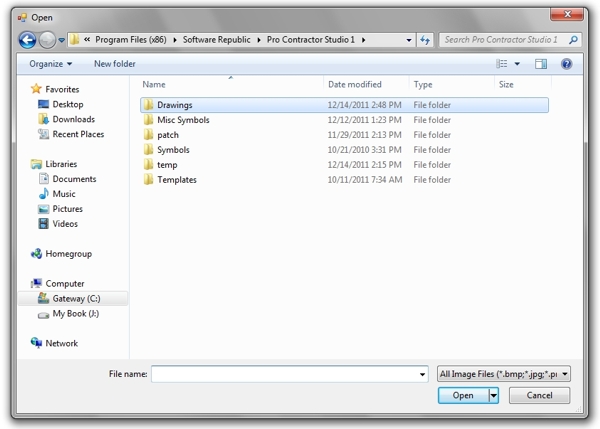
Locate the folder where the image file is located on the computer.
-
Select the type of file to load from the Files of type drop down list. Pro Contractor Studio� will allow you to load Windows Bitmap (*.bmp), JPEG Bitmap (*.jpg), Portable Graphics Network (*png) and TIFF Bitmap (*.tif) image files.
-
Select a file name from the list of files located in the chosen directory or type the file name in the File name text box.
-
Click on the Open button to place the image file name into the Image Insertion dialog box.
To insert an image of the screen:
-
Take a picture of what is on your computer screen by pressing Print Screen button (PRTSC or PRTSCN on some keyboards). This is called a screen capture. If you have more than one program open at the same time, press the Alt + Print Screen buttons to capture only the active window.
- Click on the Paste Image from Clipboard
 button or the Paste
  icon in the top left corner of the Image Insertion dialog box to paste the screen capture into the command.
Adjusting any settings and inserting the image onto the design screen:
-
You can change the view of the image by zooming in and out. You can zoom in or out by rolling the scroll button (mouse wheel) on the mouse, or by holding down the Ctrl key and pressing the Plus (+) or Minus (-) key on the keyboard. Zooming in or out does not change the actual size of image, it simply changes the magnification level making the image appear larger or smaller.
You can pan or move the image around within the dialog box. You can pan by holding down the scroll button (mouse wheel) while moving the mouse, or by holding down the Ctrl key and pressing an Arrow  key. Panning does not change the location of the image.
You can return the image to full zoom by clicking on the Zoom to Extents  icon.
icon.
-
Change the Rotation of the image by clicking on the Rotate CCW (Counterclockwise)  or Rotate CW (Clockwise)
  icons.
-
Crop the image by clicking on the Crop Image  icon, positioning the selection box, and clicking on the Apply button.
-
Change the size of the image by clicking on the Resize  icon, entering the new pixel Width and Height near the bottom of the dialog box, and clicking on the Apply button.
-
Adjust the opacity of the image. Move the Slider Bar  , click on the up and down arrows, or type a value in the text box and press the Enter key to adjust the image opacity or transparency.
-
From the Image Type drop down menu, select Background Image to place the image on the design screen to be used as the background for design purposes. Select Floating Image to place an image on the design screen such as a company logo or license seal at a specific rotation angle and size.
-
From the Save Type drop down menu, select the method of associating the image file with the .pcs drawing file.
Selecting External file reference will associate the image with the .pcs drawing file by reference. If the image file is moved from its referenced location or if the file name is changed, when opening the drawing an option will appear allowing you to relocate the image file. If changes are made to the original image file, the changes will be displayed upon opening the .pcs drawing file.
Selecting Embed within drawing file will permanently insert the image file into the .pcs drawing file. Changes to the original image file will not be displayed upon opening the .pcs drawing file. Embedding the image inside of the .pcs drawing file will increase the size of the drawing file.
-
If Floating Image is selected as the Image Type, in the Fit To text box, enter the desired size of the image once it is placed on the design screen in units. Select either Width or Height from the drop down menu to size the image file on the screen.
-
If changes are made to the image such as changing the rotation angle or cropping the image, it is necessary to save the image before inserting it onto the drawing screen. Click on the Save Changes button and save the image to a new file name.
-
Click on the Insert Image button and the image file will appear on your mouse cursor.
-
Drag the image to the desired location and click one time with the left mouse button to insert the image into the design.
-
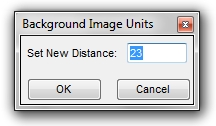
If Background Image is selected as the Image Type, it is necessary to scale the image to match the current drawing units.
You will need to locate two points on the image that are a known distance apart from one another. For example, the length of a property line, the length of a building wall, or the width of a sidewalk or driveway. Set a point at each end of the known distance. For example, in the illustration below the user is setting a point at each end of a building wall that is 20 units in length.

Set two points on the image a known distance apart from one another.
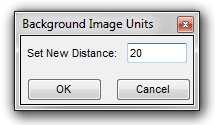
In the resulting Set Background Image Units dialog box, the current units will be displayed in the Set New Distance text box. Enter the correct distance between the two points. In this example, the user will change the current unit setting of 23 to 20 in the text box.
|
|
|
|
|
Current distance between the two points.
|
|
Enter known distance between the two points.
|
Click on the OK button to scale the image file on the design screen.
Note:
-
The background image is automatically placed on a Background Image layer. The layer is locked  to prevent moving the background image during the design process. You can unlock
  the layer in the Layer Manager.
-
Floating images are inserted on the current drawing layer. The current drawing layer is indicated by the  symbol to the left of the layer name in the drop down menu or Layer Manager window.
-
You can scale an existing image on the design screen by using the Scale command.
-
If an image is larger than the paper upon which it is placed, the image will appear transparent outside of the paper boundary. To fit the image entirely on the paper, adjust the size of the paper or the output drawing scale in the Drawing Page Setup command.
-
You cannot insert an Adobe PDF file. A PDF file must be converted to a raster image format and the raster image can then be inserted into a drawing using the Insert Image command.
Back to All Topics