Fixture Selection and Settings
Fixture Selection and Settings
Fixture Selection and Settings
Menu: |
Lighting
 Fixtures Fixtures |
Toolbar Icon: |

|
Before you can place a fixture symbol
on the design screen, you may need to add the desired fixture to the database.
You must then select the fixture from the database and assign a symbol
to represent the fixture on the design screen. You may then place as many
fixtures on the design as necessary.
Adding a fixture to the database:
Select a Manufacturer
from the drop down menu. You can add,
delete or rename the manufacturer selections. Deleting a Manufacturer
will delete all fixture categories, all fixtures, and all lamps assigned
to the manufacturer in the database. You
cannot undo a deletion. Once a Manufacturer is deleted, the
data will be lost and you will have re-enter the data into the database
to restore the information.
Click on the Fixtures
tab.
Select the fixture Category
from the drop down menu. You can add,
delete or rename the category selections. Deleting a fixture Category
will delete all lighting fixtures within the category. You
cannot undo a deletion. Once a Category is deleted, the data
will be lost and you will have re-enter the data into the database
to restore the information.
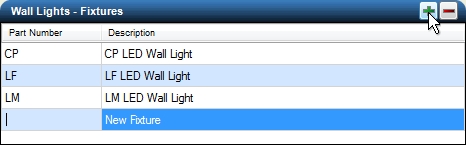
Add a fixture to the list by clicking on the Add button or  icon in the Fixtures header.
A New Fixture will appear in the list. Enter a base Part
Number and Description
for the new lighting fixture by clicking one time in each area with
the left mouse button.
icon in the Fixtures header.
A New Fixture will appear in the list. Enter a base Part
Number and Description
for the new lighting fixture by clicking one time in each area with
the left mouse button.
New Fixture added to the list of
existing fixtures.
- Add each individual fixture configuration by clicking
on the Add button or icon in the Fixture
Configurations header. Each new fixture configuration will
automatically include the base part number of the fixture and the
description of the fixture. The new configuration will inherit the
number of lamps and whether or not the lamp is included with the fixture
from the previous entry.
Enter the full Part Number
by clicking one time in the area with the left mouse button and typing
the complete part number.
Modify the Description as necessary.
Enter the number of lamps included with the
fixture configuration in the # Lamps
text box.
If the lamp(s) are included with the fixture configuration, click on
Lamp Included with the left
mouse button until a checkmark appears in the box.
Click on the Lamp drop down
menu and click on the desired lamp selection one time with the left
mouse button to assign the lamp to the fixture configuration.
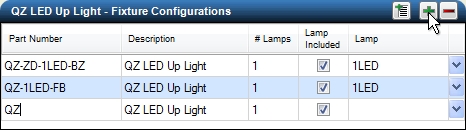
New fixture configuration added to
the list.
Add multiple fixture configurations at one time by
clicking on the Add List button
or  icon in the Fixture Configurations
header. Type one or more fixture configurations in the Add Configurations List dialog box
or copy and paste the list from another application such as Microsoft� Word or Excel. Press
the Enter key after each new
configuration to start a new line with a new configuration.
icon in the Fixture Configurations
header. Type one or more fixture configurations in the Add Configurations List dialog box
or copy and paste the list from another application such as Microsoft� Word or Excel. Press
the Enter key after each new
configuration to start a new line with a new configuration.
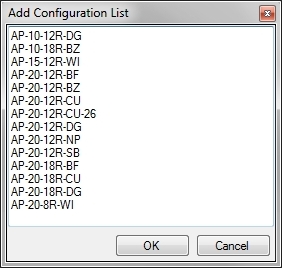
Multiple configurations to add to
the list
Click on the OK button to insert
the configuration list into the database. Each new fixture configuration
will automatically include the base description of the fixture. The
new configurations will inherit the number of lamps and whether or
not the lamp is included with the fixture from the previous entry.
Modify the Description as necessary.
Click on the Lamp drop down
menu and click on the desired lamp selection one time with the left
mouse button to assign the lamp to each new fixture configuration.
You may delete a fixture configuration of an entire
category of fixtures by clicking on the Delete
button or  icon. Answer
Yes to the resulting prompt
to delete the information from the database, or No
to exit without deleting the information. You
cannot undo a deletion. Once an item is deleted, the data will
be lost and you will have re-enter the data into the database to restore
the information.
icon. Answer
Yes to the resulting prompt
to delete the information from the database, or No
to exit without deleting the information. You
cannot undo a deletion. Once an item is deleted, the data will
be lost and you will have re-enter the data into the database to restore
the information.
To select a fixture and adjust any settings:
Select a Manufacturer
from the drop down menu. You can add,
delete or rename the manufacturer selections.
Click on the Fixtures
tab.
Select the fixture Category
from the drop down menu. You can add,
delete or rename the category selections.
Select a fixture type in the Fixtures
list. The fixture selections will be sorted alphabetically.
Select a Fixture
Configuration from the list.
If necessary, make adjustments to the fixture
configuration in the associated text boxes and drop down menus.
Before a fixture may be placed on a design, you must
assign a symbol to represent the fixture on the design screen. Click
on the drop down arrow to the right of the Symbol
label to view the available choices. Click one time on the
symbol to assign to the selected fixture.
To assign a
to the symbol, click on the Symbol
Color button. Click on the
color of your choice or enter the Red, Green, and Blue values in the
associated text boxes. Click on the OK
button to accept the color assignment.
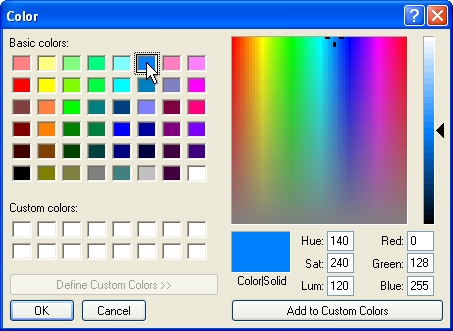
Select a color assignment and click on the OK button.
Click on the OK
button to begin placing the lighting fixture on the design screen.
Note:
Deleting a Manufacturer will delete all fixture categories,
all fixtures, and all lamps assigned to the manufacturer in the database.
You cannot undo a deletion.
Once a Manufacturer is deleted, the data will be lost and you will
have re-enter the data into the database to restore the information.
Deleting a fixture Category will delete all lighting
fixtures within the category. You
cannot undo a deletion. Once a Category is deleted, the data
will be lost and you will have re-enter the data into the database
to restore the information.
Set the cost associated with each fixture and the
tied assembly assignment in the Equipment
Costs command.
Wattage and voltage may be associated with a lamp
on the Lamps tab.
Expand or contract
sections as required.
Back to All Topics