Fill Materials
Fill Materials
Fill Materials
|
Menu:
|
Landscape  Area/Volume Calcs and Fill Materials Area/Volume Calcs and Fill Materials
|
|
Toolbar Icon:
|

|
The Fill Material command will allow you to create a database of fill material to be used with the Area/Volume Calcs command. You can group the fill materials into categories for easy selection. For example, you may create a category called Brick Pavers or Bedding Mix. In the Brick Pavers category you might add a fill material for brick pavers and one or more fill materials for the sand base. The Bedding Mix category may include a fill material for top soil and another for a bark mulch. You can assign hatching patterns to the fill material to make them easy to locate on the drawing screen. The fill settings for the first fill material assigned to an area will display on the design screen.
To create a database of fill materials:
-
Click on the Fill Materials tab.
-
Click on the Category drop down menu and select a category of fill material selections. You can add, delete or rename the category names.
-
Click on a fill material in the list one time with the left mouse button. You can add, delete or rename the fill materials.
-
The pricing information must be based on either square or cubic units. Select the pricing basis for the fill material from the List Price/Labor Rate Based On drop down menu.
-
Select a fill pattern from the Fill Material Fill Settings icons by clicking on a selection one time with the left mouse button.
|

|

|

|

|

|
|
None
|
Solid
|
Linear Gradient
|
Radial Gradient
|
Hatch
|
-
To assign the for the fill pattern, click on the Color button(s). Click on the color of your choice or enter the Red, Green, and Blue values in the associated text boxes. Click on the OK button to accept the color assignment. If a gradient is selected, select two colors to create the blend.
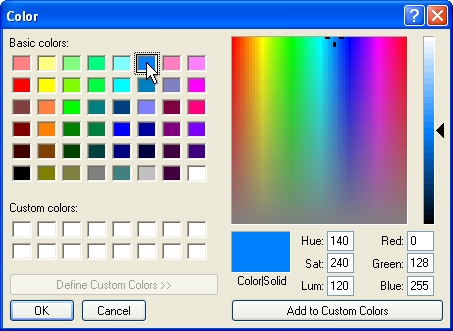
Select a color assignment and click on the OK button.
-
Adjust the opacity of the fill color(s). Move the Slider Bar  , click on the up and down arrows, or type a value in the text box and press the Enter key to adjust the fill opacity or transparency.
-
If Radial Gradient is selected as the fill pattern, adjust the center for the gradient by clicking inside of the Gradient Center. Hold down the left mouse button and drag the red plus sign to a new location. Release the mouse to reposition the center of the radial fill.
-
If Hatch is the chosen fill type, click on the drop down arrow to the right of the Pattern label to view the available symbol choices. Click one time on the pattern to fill the selected entity. Enter the angle for the hatching pattern in the Angle text box. Enter the scale of the pattern in the Scale text box.
-
In the Fill Render Settings, select a render setting from the Type drop down menu. Render settings apply a textured background to make symbols or areas look more hand painted or colored such as pencil sketching or water-colored. Enter the angle for the background in the Angle text box. Enter the scale of the background in the Scale text box.
-
Click on the Close button to exit the command.
Note:
-
In the Material List / Estimate command, you may list fill material calculations by Area or as a total of all Areas combined.
-
You must assign the fill settings prior to assigning a fill material to an area.
-
You can speed up the design process by temporarily turning the fill patterns off in the Layer Manager.
Back to All Topics