Fill
Fill
Fill
|
Menu:
|
View  Fill Fill
|
|
Shortcut Keys:
|
|
|
Toolbar Icon:
|

|
Using the Fill command, you can fill the selected entities on the design screen with a solid color, gradient blend or a hatching pattern. You can also apply a render setting to apply a textured background giving the entities a hand-painted look. Objects or entities that may be filled include lines, curves, arcs and circles. Lines and curves must be made up of three or more points to fill.
To fill the selected entities:
-
Select one or more lines, curves, arcs or circles on the design screen. Entities do not have to be "closed" for the fill command to function properly. An imaginary line will connect the first and last point set to create the entity. Refer to the following illustration.
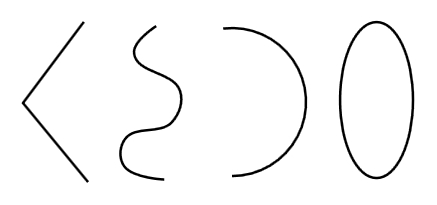
Entities to Fill - Line, Curve, Arc or Circle / Ellipse

Filled Entities - Line, Curve, Arc or Circle / Ellipse
-
Select a fill pattern from the Fill Type icons across the top of the dialog box by clicking on a selection one time with the left mouse button. Choose None to remove a fill pattern from the selected entities.
|

|

|

|

|

|

|

|

|
|
None
|
Solid
|
Linear Gradient
|
Radial Gradient
|
Hatch
|
Image
|
Inherit
|
Templates
|
-
To assign the for the fill pattern, click on the Color button(s). Click on the color of your choice or enter the Red, Green, and Blue values in the associated text boxes. Click on the OK button to accept the color assignment. If a gradient is selected, select two colors to create the blend.
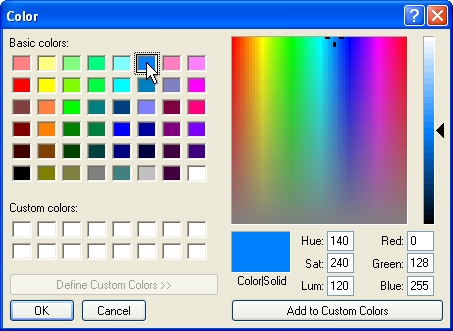
Select a color assignment and click on the OK button.
-
Adjust the opacity of the fill color(s). Move the Slider Bar  , click on the up and down arrows, or type a value in the text box and press the Enter key to adjust the fill opacity or transparency.
-
If Radial Gradient is selected as the fill pattern, adjust the center for the gradient by clicking inside of the Gradient Center. Hold down the left mouse button and drag the red plus sign to a new location. Release the mouse to reposition the center of the radial fill.
-
If Hatch is the chosen fill type, click on the drop down arrow to the right of the Pattern label to view the available symbol choices. Click one time on the pattern to fill the selected entity. Enter the angle for the hatching pattern in the Angle text box. Enter the scale of the pattern in the Scale text box.
-
If Image is the chosen fill type, click on the drop down arrow to the right of the Image Fill box to view the available image choices. Each image is an individual file that must be stored in the ...\Pro Contractor Studio\data\fills folder on the computer.
Click one time on the image to fill the selected entity. Enter the angle for the image in the Angle text box. Enter the scale of the image in the Scale text box.
-
In the Fill Render Settings, select a render setting from the Type drop down menu. Render settings apply a textured background to make symbols or areas look more hand painted or colored such as pencil sketching or water-colored. Enter the angle for the background in the Angle text box. Enter the scale of the background in the Scale text box.
-
If Template is chosen as the fill type, select a fill from the list of template settings.
-
Click on the Apply Fill To Selection button to complete the command.
Note:
-
You can create a template of fill pattern selections to prevent the repetitive entry.
-
Lines and curves must consist of three or more points to fill.
-
The fill pattern itself is not a separate entity. The fill will appear on the layer on which the entity is drawn.
-
You can speed up the design process by temporarily turning the fill patterns off in the Layer Manager.
Back to All Topics