Disconnection Errors
Disconnection Errors
Disconnection Errors
|
Menu:
|
Irrigation  Pipe Sizing Pipe Sizing
|
|
Toolbar Icon:
|

|
When automatically sizing pipe, you may receive the Disconnection Errors dialog box containing a list of locations within the layout where pipe is not connected to another piece of pipe or to a piece of irrigation equipment.
To see the problem area on the design:
-
If a problem appears on the design, the Disconnection Errors dialog box will appear with a list of all potential problems broken out by Pipe Disconnections and Symbol Disconnections.
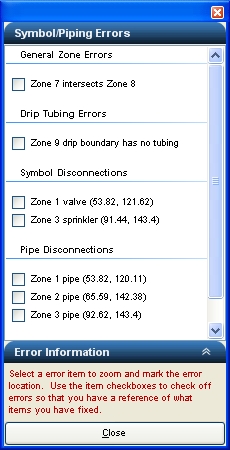
Disconnection Errors dialog box with potential problem locations.
-
Click on a disconnection in the list. The software will center the problem in the piping layout on the screen and highlight the problem area with a animated colored circle  . The only errors that are not located and centered on the drawing are problems with two zones intersecting one another. You must physically locate these errors on the design.
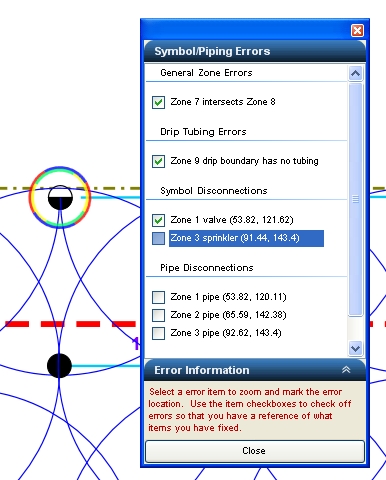
Click on a disconnection problem in the list to mark the location on the screen.
-
Use the commands available in the software to connect the pipe to another piece of pipe or to an irrigation symbol.
-
Click on the checkbox to the left of the problem in the list to indicate the problem has been repaired to avoid repetitive work. This is just a reminder that the problem has been repaired.
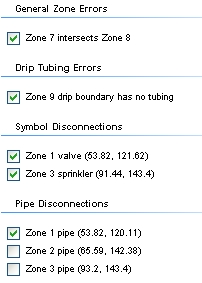
Problems marked as repaired.
-
Click on the next error in the list and continue the process until all disconnections are repaired.
-
Click on the Close button to exit the dialog box.
There are several main reasons why you might receive the Disconnection Errors dialog box. Below is a list of the possible problems and the solutions for each one.
Potential Problem Number One:
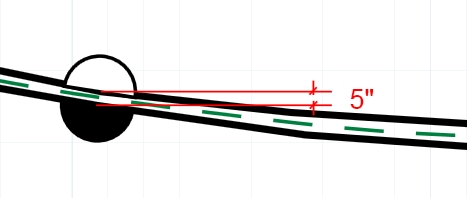
The endpoint of a pipe does not connect to the insertion point of an irrigation symbol or to the endpoint of another piece of pipe. Refer to the following illustration for an example.
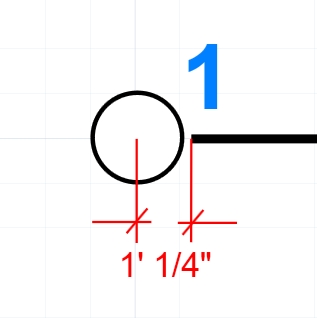
Pipe does not connect within 6" of the insertion point of the irrigation symbol.
When you select a symbol on the drawing screen four small arrows appear indicating the base point or insertion point for the symbol. If the pipe stops or starts with a distance greater than 0.50 feet from the insertion point of the symbol, the program will not consider the pipe as being connected to the irrigation symbol or to another piece of pipe. You can adjust the Pipe Connection Distance in the Options command on the Irrigation tab.
Solution:
-
Click on the piece of pipe to select the pipe. A small box will appear on each of the endpoints of the pipe.
-
Place the mouse cursor over the small box at the endpoint of the pipe and click one time with the left mouse button.
-
Drag the endpoint of the pipe closer to the insertion point of the symbol or the endpoint of another piece of pipe.
-
Click one time with the left mouse button to move the endpoint of the pipe to the new location.
-
If this does not solve the problem, select the sprinkler or control valve symbol and reassign it to the zone using the Zoning command.
Potential Problem Number Two:
Occasionally you will size the pipe for one zone and it will intersect pipe on another zone. This problem occurs when the endpoint of two pieces of pipe on different zones or the symbol insertion point on two sprinkler symbols on different zones are within 6 inches of each other. You can adjust the Pipe Connection Distance in the Options command on the Irrigation tab.
This normally occurs when turf sprinklers are back to back with shrub sprinklers or when lateral line pipe for two different zones is drawn too close together. Refer to the following illustration for an example.
Sprinkler symbols from two different zones are within 6" of each other.
Solution:
-
Space the sprinkler symbols or further apart. The symbols must be greater than 6 inches away from one another.
-
Redraw the pipe and make sure that no end point of a piece of pipe is within 6 inches of the endpoint of a piece of pipe servicing another zone.
Potential Problem Number Three:
A sprinkler or control valve symbol has not been assigned to the zone.
Solution:
-
Select the sprinkler or control valve symbols for the zone and reassign them to the zone using the Zoning command.
Potential Problem Number Four:
An intersection of pipe creates a situation where the endpoints of pipe on the same zone are further than 6" away from each other.
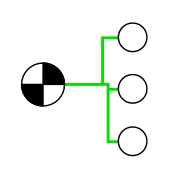
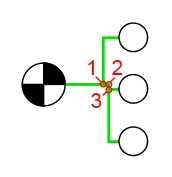
For example, assume you have a several tee fittings that connect to pipe near an ell fitting as shown in the illustration below.
Points 1 and 2 are within 6" of each other so the software determines that they share an endpoint. Points 2 and 3 are within 6" of each other as well, so they share an endpoint. You can adjust the Pipe Connection Distance in the Options command on the Irrigation tab.
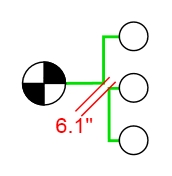
As far as the software is concerned, the intersection appears similar to the illustration below.

The endpoints of the two sections of pipe in this example are now considered to be more than 6" away from each other.
Solution:
-
Redraw the intersection so that the endpoints of the pipe are within 6" of each other.
Potential Problem Number Five:
A message may appear indicating, "There was a problem calculating the zone x-x."
Problem:
In most cases the problem is caused by two or more sections of pipe connected to sprinklers assigned to the same zone are not connected to each other.
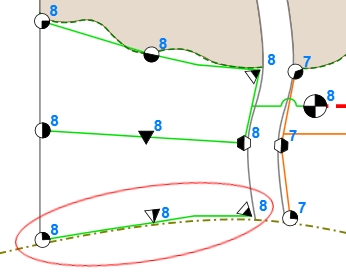
The bottom row of sprinklers symbols on zone 8 are not connected to the remaining sprinklers on the zone.
Solution:
-
Make use of the Pipe command to draw a piece of pipe connecting the different sections within the zone.
Potential Problem Number Six:
During hydraulic calculations you may receive the following error message - Control valve not connected to water source.
Problem:
The mainline pipe does not stop or pass within 6" of the control valve symbol or the mainline pipe is not connected to the water source symbol such as the water meter or pump station. You can adjust the Pipe Connection Distance in the Options command on the Irrigation tab.
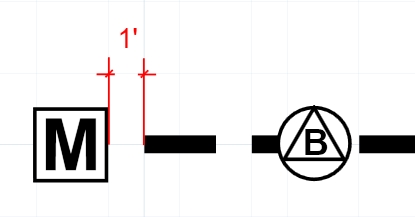
The mainline pipe does not end within 6" of the insertion point of the water meter symbol.
Solution:
-
Click on the piece of pipe to select the pipe. A small box will appear on each of the endpoints of the pipe.
-
Place the mouse cursor over the small box at the endpoint of the pipe and click one time with the left mouse button.
-
Drag the endpoint of the pipe closer to the insertion point of the symbol or the endpoint of another piece of pipe.
-
Click one time with the left mouse button to move the endpoint of the pipe to the new location.
Note:
-
Pipe may be hidden behind equipment symbols. You may need to move the symbol to the back or move the pipe to the front to determine if there is a connection problem.
-
You can adjust the Pipe Connection Distance in the Options command on the Irrigation tab.
Back to All Topics