Array
Array
Array
|
Menu:
|
Edit  Array Array
|
|
Shortcut Keys:
|
|
|
Toolbar Icon:
|

|
The Array command will copy or duplicate the selected object a specified number of times in either columns and rows, in a circular pattern, or along a selected path. If you select multiple objects, the objects will be treated as one item to be copied and arrayed. The command is great for placing stepping stones, fence posts and more. The command may also be used for placing plant symbols at desired spacings along a line or curve.
To duplicate the selected object in a rectangular array:
-
Select the objects to be arrayed.
-
Set a base point location from which to array the selected entities by holding down the Ctrl key on the keyboard and clicking on the design screen at the new location.
-
Select the Array command from the Edit menu or click on the toolbar icon.
-
Click on the Rectangular tab.
-
Enter the number of rows for the array in the Number of Rows text box.
-
Enter the distance from one row to another in the Row Spacing text box or click on the  button and set two points on the design screen for the row distance.
-
Enter the number of columns for the array in the Number of Columns text box.
-
Enter the distance from one column to another in the Column Spacing text box or click on the button and set two points on the design screen for the column distance.

Selected plant symbol with a 3' radius with 3 rows and 5 columns at spacings of 7 and a 0 angle
-
Enter the angle of the rows in the Row Angle text box or click on the button and set two points on the design screen for the row angle. Rows typically run horizontal on the design screen while columns run vertical.
Selected plant symbol arrayed at a 15� angle
-
Click on the OK button to array the selected objects on the design screen.
To duplicate the selected object in a polar or circular array:
-
Select the objects to be arrayed. Objects will be arrayed based on the center point of all selected objects.
-
Select the Array command from the Edit menu or click on the toolbar icon.
-
Click on the Polar tab.
-
Enter the X and Y points for the Center Point of the polar array or click on the button and set a point on the design screen by clicking one time with the left mouse button to set the center point. You can also press and hold down the Ctrl key and click one time with the left mouse button to set the center point location.
Selected object and set Center Point for the array
-
Enter the number of copies in the Number of Items text box. This number includes the original selected object.
-
Enter an angle in the Angle to Fill text box. When creating a polar array, a positive angle will array the objects in a counterclockwise direction while a negative angle will array the objects in a clockwise direction.
-
To rotate the objects as they are placed around the arc, enable the Rotate Items check box by clicking on the selection with the left mouse button until a checkmark appears in the box.
-
Click on the OK button to array the selected objects on the design screen.

Selected objected arrayed at a 360� angle with ten items
To duplicate the selected object along a chosen path:
-
Select the objects to be arrayed.
-
Set a base point location from which to array the selected entities by holding down the Ctrl key on the keyboard and clicking on the design screen at the new location.
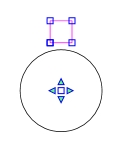
Selected object with handle set in the center of the object
-
Select the Array command from the Edit menu or click on the toolbar icon.
-
Click on the Path tab.
-
Click on the Select Path button and follow the Status Bar at the bottom of the screen. Click one time with the left mouse button on a line, curve or arc on the design screen. The length of the selected path will appear in the Path Length text box.
-
Enter the desired spacing for the objects along the selected path in the Desired Spacing text box.
-
To space the objects evenly along the entire length of the path, enable the Force Even Spacing check box by clicking on the selection with the left mouse button until a checkmark appears in the box. The calculated spacing of the symbols will be displayed in the Actual Spacing text box.
-
To rotate the objects along the same angle as the path, enable the Rotate Items check box by clicking on the selection with the left mouse button until a checkmark appears in the box.
-
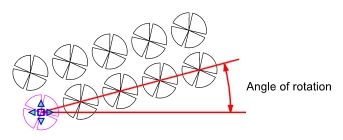
Click on the OK button to array the selected objects on the design screen.
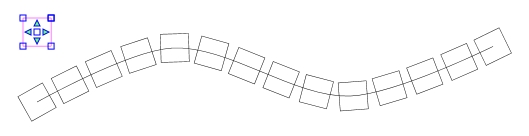
Selected object arrayed along a curved path with Force Even Spacing and Rotate items enabled
Back to All Topics